DjangoNote 一覧

予定していたところまで書けて、一段落したのでまとめておく。
- DjangoNote 1 概要
- DjangoNote 2 基本形
- DjangoNote 3 設定ファイルを複数つくる
- DjangoNote 4 Apache で開く
- DjangoNote 5 Apache で静的ファイルを開く
- DjangoNote 6 ページ追加
- DjangoNote 7 Server Error 500 を表示
- DjangoNote 8 さくらVPS、お名前ドメインでデプロイ
- DjangoNote 9 MySQL を使う
- DjangoNote 10 ベーシック認証
- DjangoNote 11 DB 初期値、マスタデータ登録
ぼくが Mrrhp を作るにあたって覚えた(覚えなきゃならんかった)ことはこれでおおよそすべてだ。
所感
シリーズ……連載を書くのは結構タイヘンだった。長くなるほど構成に一貫性をもたせるのが難しくなる。それと、各記事では各テーマに関連のある部分の設定だけ載せるようにしたけど、いきなりそのページに来たらファイルの全体が見れなくてちんぷんかんぷんだろうな、とかは思った。各記事の独立性が下がっちゃうってことね。
というわけで、そのフォローとして、以下に設定ファイルの全体図を載せておく。
シリーズで作成した設定ファイルたち
Vagrantfile
# -*- mode: ruby -*-
# vi: set ft=ruby :

Vagrant.configure("2") do |config|

  # CentOS7 を指定。
  config.vm.box     = "CentOS7.2"
  config.vm.box_url = "https://github.com/CommanderK5/packer-centos-template/releases/download/0.7.2/vagrant-centos-7.2.box"

  # CentOS は 192.168.33.10 に設置。
  config.vm.network "private_network", ip: "192.168.33.10"

  # Mac の 9000 ポートを CentOS の 80 につなげる。
  config.vm.network "forwarded_port", guest: 80, host: 9000

  # なんだっけこれ。無いとなんかでつまらんエラーが起こった気がする。
  config.vm.hostname = "django.local"

  # このディレクトリと CentOS の /vagrant ディレクトリを同期させる。
  config.vm.synced_folder ".", "/vagrant"

  # この sh を CentOS 内で実行できる。
  config.vm.provision :shell, :path => "provision.sh"
end
provision.sh
#!/bin/sh
# よくわかってないけど yum 先輩のアップみたいなもんを行う。
yum makecache fast
yum update -y
# MySQL をインストール。
touch /etc/yum.repos.d/MariaDB.repo
chmod 777 /etc/yum.repos.d/MariaDB.repo
cat << __EOF__ > /etc/yum.repos.d/MariaDB.repo
[mariadb]
name = MariaDB
baseurl = http://yum.mariadb.org/10.3/centos7-amd64
gpgkey=https://yum.mariadb.org/RPM-GPG-KEY-MariaDB
gpgcheck=1
__EOF__
yum install -y MariaDB-server MariaDB-client
systemctl start mysqld
# とりあえず root:password でログインできるように。
mysqladmin -u root password 'password'
# MySQL 初期設定。文字コードとか Django が使うデータベース。
mysql -u root -ppassword << __EOF__
SET character_set_database=utf8;
SET character_set_server=utf8;
CREATE DATABASE app;
__EOF__
# Python3.6 インストール。これで python3.6 コマンドが使えるようになる。
yum install -y https://centos7.iuscommunity.org/ius-release.rpm
yum install -y python36u python36u-libs python36u-devel
# Python3.6 の仮想環境を CentOS のルートに作る。
python3.6 -m venv /env3.6
# 仮想環境をアクティベート。これで python コマンドで 3.6 が使えるようになる。
source /env3.6/bin/activate
# pip 用意。
curl https://bootstrap.pypa.io/get-pip.py -o /get-pip.py
python /get-pip.py
rm /get-pip.py -f
pip install --upgrade pip setuptools
# requirements からライブラリを取得。
pip install -r /vagrant/requirements.txt
# migrate を行う。
# manage.py はテスト環境の DB 設定を使うので、本番用設定を使うようオプションをつける。
python /vagrant/manage.py migrate --settings=config.settings.for_production
# Apache インストール。
yum install -y httpd httpd-devel
# Apache 先輩が Python の wsgi モジュールを使うための設定ファイル。
# モジュールの位置は find /env3.6 -name 'mod_wsgi*.so' でわかる。
touch /etc/httpd/conf.modules.d/mod_wsgi.conf
chmod 777 /etc/httpd/conf.modules.d/mod_wsgi.conf
cat << __EOF__ > /etc/httpd/conf.modules.d/mod_wsgi.conf
LoadModule wsgi_module /env3.6/lib/python3.6/site-packages/mod_wsgi/server/mod_wsgi-py36.cpython-36m-x86_64-linux-gnu.so
WSGIPassAuthorization On
__EOF__
# Apache 先輩が Django を使うための設定ファイル。
touch /etc/httpd/conf.d/django.conf
chmod 777 /etc/httpd/conf.d/django.conf
cat << __EOF__ > /etc/httpd/conf.d/django.conf
WSGIPythonHome /env3.6
WSGIPythonPath /vagrant:/env3.6/lib/python3.6/site-packages
Alias /favicon.ico /var/www/static/favicon.ico
Alias /static/ /var/www/static/
<Directory /var/www/static>
Require all granted
</Directory>
WSGIScriptAlias / /vagrant/config/wsgi.py
<Directory /vagrant/config>
<Files wsgi.py>
Require all granted
</Files>
</Directory>
__EOF__
chmod 777 /var/www
# Django の静的ファイルを STATIC_ROOT に指定したディレクトリへコピー。
python /vagrant/manage.py collectstatic -c --noinput --settings=config.settings.for_production
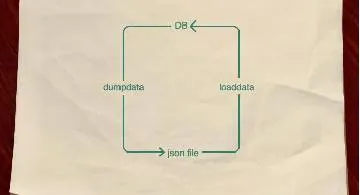
# DB の初期データをロードする。
python /vagrant/manage.py loaddata /vagrant/initial_db_data.json --settings=config.settings.for_production
# ファイアウォールの設定。
systemctl restart firewalld
firewall-cmd --add-service=http --zone=public --permanent
firewall-cmd --add-service=https --zone=public --permanent
# 外部から DB を覗いてみたいならこれを書く。セキュリティに悪いし書かなくてもいい。
firewall-cmd --add-service=mysql --zone=public --permanent
systemctl restart firewalld
# Apache を起動。
apachectl restart
# CentOS の起動ごとに Apache も起動させる。
systemctl enable httpd.service
requirements.txt
Django==2.1.8
mod-wsgi==4.6.5
PyMySQL==0.9.3
pytz==2019.1
settings/base.py
"""
Django settings for config project.

Generated by 'django-admin startproject' using Django 2.1.8.

For more information on this file, see
https://docs.djangoproject.com/en/2.1/topics/settings/

For the full list of settings and their values, see
https://docs.djangoproject.com/en/2.1/ref/settings/
"""

import os

# Build paths inside the project like this: os.path.join(BASE_DIR, ...)
BASE_DIR = os.path.dirname(os.path.dirname(os.path.dirname(os.path.abspath(__file__))))


# Quick-start development settings - unsuitable for production
# See https://docs.djangoproject.com/en/2.1/howto/deployment/checklist/

# SECURITY WARNING: keep the secret key used in production secret!
SECRET_KEY = '$+%ov*3wg$*ba*rt-y@1tfo3^49m&vo8idcrfdjju)i+!os72o'

# SECURITY WARNING: don't run with debug turned on in production!
DEBUG = True

ALLOWED_HOSTS = []


# Application definition

INSTALLED_APPS = [
    'django.contrib.admin',
    'django.contrib.auth',
    'django.contrib.contenttypes',
    'django.contrib.sessions',
    'django.contrib.messages',
    'django.contrib.staticfiles',
]

MIDDLEWARE = [
    'django.middleware.security.SecurityMiddleware',
    'django.contrib.sessions.middleware.SessionMiddleware',
    'django.middleware.common.CommonMiddleware',
    'django.middleware.csrf.CsrfViewMiddleware',
    'django.contrib.auth.middleware.AuthenticationMiddleware',
    'django.contrib.messages.middleware.MessageMiddleware',
    'django.middleware.clickjacking.XFrameOptionsMiddleware',
]

ROOT_URLCONF = 'config.urls'

TEMPLATES = [
    {
        'BACKEND': 'django.template.backends.django.DjangoTemplates',
        # templates ディレクトリ以下にテンプレートを置くよって設定。
        'DIRS': [os.path.join(BASE_DIR, 'templates')],
        'APP_DIRS': True,
        'OPTIONS': {
            'context_processors': [
                'django.template.context_processors.debug',
                'django.template.context_processors.request',
                'django.contrib.auth.context_processors.auth',
                'django.contrib.messages.context_processors.messages',
            ],
        },
    },
]

WSGI_APPLICATION = 'config.wsgi.application'


# Database
# https://docs.djangoproject.com/en/2.1/ref/settings/#databases

DATABASES = {
    'default': {
        'ENGINE': 'django.db.backends.sqlite3',
        'NAME': os.path.join(BASE_DIR, 'db.sqlite3'),
    }
}


# Password validation
# https://docs.djangoproject.com/en/2.1/ref/settings/#auth-password-validators

AUTH_PASSWORD_VALIDATORS = [
    {
        'NAME': 'django.contrib.auth.password_validation.UserAttributeSimilarityValidator',
    },
    {
        'NAME': 'django.contrib.auth.password_validation.MinimumLengthValidator',
    },
    {
        'NAME': 'django.contrib.auth.password_validation.CommonPasswordValidator',
    },
    {
        'NAME': 'django.contrib.auth.password_validation.NumericPasswordValidator',
    },
]


# Internationalization
# https://docs.djangoproject.com/en/2.1/topics/i18n/

LANGUAGE_CODE = 'en-us'

TIME_ZONE = 'UTC'

USE_I18N = True

USE_L10N = True

USE_TZ = True


# Static files (CSS, JavaScript, Images)
# https://docs.djangoproject.com/en/2.1/howto/static-files/

STATIC_URL = '/static/'

# ここに記したフォルダを静的ファイルと認識する。
STATICFILES_DIRS = [os.path.join(BASE_DIR, 'static')]
settings/for_test.py
from .base import *
settings/for_production.py
from .base import *

# 静的ファイルとエラーを配信しない。
DEBUG = False
# 公開するサイトのドメインを書くけどまだないので * (すべて)にしとく。
ALLOWED_HOSTS = ['*']

import pymysql
DATABASES = {
    'default': {
        'ENGINE'   : 'django.db.backends.mysql',
        'NAME'     : 'app'                     ,
        'USER'     : 'root'                    ,
        'PASSWORD' : 'password'                ,
        'HOST'     : 'localhost'               ,
        'PORT'     : '3306'                    ,
    }
}
pymysql.install_as_MySQLdb()


# Apache 先輩の支配領域へ静的ファイルを移動させる。
STATIC_ROOT = '/var/www/static'