概要
前回(MySQL を使う)のつづき。ベーシック認証を実装する。今回つくるのは以下のようなベーシック認証だ。
- ベーシック認証メソッドを用意する。
- 認証を使いたいページの view でそのメソッドを呼び出す。
- 認証に使う ID とパスワードは createsuperuser で作ったもの。
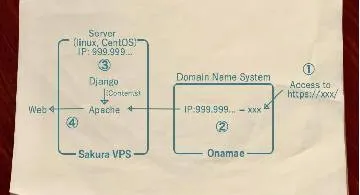
Apache 先輩に許可してもらう
provision.sh のここんとこを……
# Apache 先輩が Python の wsgi モジュールを使うための設定ファイル。
# モジュールの位置は find /env3.6 -name 'mod_wsgi*.so' でわかる。
touch     /etc/httpd/conf.modules.d/mod_wsgi.conf
chmod 777 /etc/httpd/conf.modules.d/mod_wsgi.conf
cat << __EOF__ > /etc/httpd/conf.modules.d/mod_wsgi.conf
LoadModule wsgi_module /env3.6/lib/python3.6/site-packages/mod_wsgi/server/mod_wsgi-py36.cpython-36m-x86_64-linux-gnu.so
__EOF__
#
# あとでベーシック認証用の設定を追加予定。
#
WSGIPassAuthorization を追加して、こうする。
# Apache 先輩が Python の wsgi モジュールを使うための設定ファイル。
# モジュールの位置は find /env3.6 -name 'mod_wsgi*.so' でわかる。
touch     /etc/httpd/conf.modules.d/mod_wsgi.conf
chmod 777 /etc/httpd/conf.modules.d/mod_wsgi.conf
cat << __EOF__ > /etc/httpd/conf.modules.d/mod_wsgi.conf
LoadModule wsgi_module /env3.6/lib/python3.6/site-packages/mod_wsgi/server/mod_wsgi-py36.cpython-36m-x86_64-linux-gnu.so
WSGIPassAuthorization On
__EOF__
ベーシック認証メソッド
書くのは views.py の中だろうと別ファイルだろうとどこでもいいんだけど、まあ今回は app/usrlib/basic_auth.py モジュールを用意することにしよう。
$ mkdir -p app/usrlib
$ touch app/usrlib/basic_auth.py
内容。
"""Basic Auth lib

ref: https://qiita.com/yukilab/items/b0467b6988657bc8950d

# How to use
from app.usrlib import basic_auth
if not basic_auth.basic_auth(request):
    return basic_auth.http401()

ID,PW are made with createsuperuser.
"""

import base64
from django.contrib.auth import authenticate
from django.http import HttpResponse


def http401():
    response = HttpResponse("Unauthorized", status=401)
    response['WWW-Authenticate'] = 'Basic realm="basic auth username/password inalid"'
    return response


def basic_auth(request):
    """
    :param request:
    :return: True is authenticated. Otherwise return False
    """
    if 'HTTP_AUTHORIZATION' not in request.META:
        return False
    (auth_scheme, base64_username_pass) = request.META['HTTP_AUTHORIZATION'].split(' ', 1)
    if auth_scheme.lower() != 'basic':
        return http401()
    username_pass = base64.decodebytes(base64_username_pass.strip().encode('ascii')).decode('ascii')
    (username, password) = username_pass.split(':', 1)
    user = authenticate(username=username, password=password)
    return user is not None
テキトーに views.top で使ってみよう。
def top(request):

    # ベーシック認証。
    from app.usrlib import basic_auth
    if not basic_auth.basic_auth(request):
        return basic_auth.http401()

    # templates/app/top.html を表示する。
    return render(request, 'app/top.html')
確認
# provision.sh をいじったのでリロード。
$ vagrant provision
アクセス: http://localhost:9000/
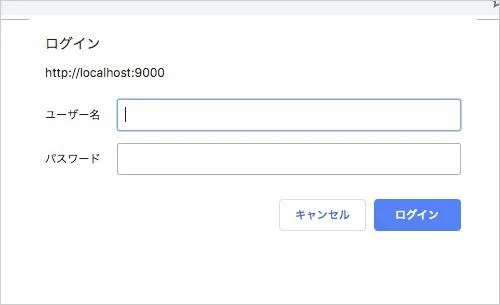
なおここのユーザ名とパスワードは createsuperuser で作ったもの。 DjangoNote シリーズでは一度も createsuperuser していないから、ついでに触れておこう。
# 仮想マシンに入る。
$ vagrant ssh
# createsuperuser する。
$ source /env3.6/bin/activate
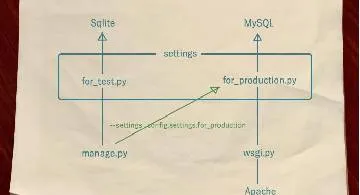
$ python /vagrant/manage.py createsuperuser --settings=config.settings.for_production
イキナリこの記事に来た人のために補足しておくと、このシリーズでは以下のような環境になっているので上述のようなコマンドになる。
- Vagrant
- CentOS7
- venv による Python3.6 仮想環境
- テスト環境用 settings と本番環境用 settings があり、使用 DB がそれぞれ違う。
次回予告
ところで、仮想マシンの構築なんて失敗ばっかりだから頻繁に壊してはリセットするものなのだよ。
# Vagrant 仮想マシンリセットコマンド。
$ vagrant halt && vagrant destroy -f && vagrant up
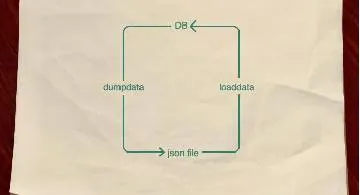
リセットしたら DB もリセットだから createsuperuser で作ったログイン情報も作り直しになる。でもそのたびに createsuperuser するのはちと面倒だ。というわけで次回は、 vagrant up 時についでに DB の初期値を作る設定を書こう。みろりHPでも、タグとかはそうやって登録しているぜ。本番環境へアップする(デプロイする)ときも勝手に初期値を埋めてくれるようになって便利。
# おつかれやんした git commit.

$ git add --all
$ git commit -m "ベーシック認証追加"