Overview
Let’s talk about React.js!
- Last time: (2024-10-08) My React.js Starter Kit

Well, of course, Python is my mother tongue and the ultimate language, right? (again)
But when I set up React.js last time, it was so much fun that I decided to add i18n (multilingual support) to the starter kit from the last post!
This time, we’ll:
- Introduce the translation extensions
i18nextandreact-i18next - Add
i18next-parserto make creating translation files more efficient
Let’s get started!
Introducing the Translation Extensions
As always, I’ll put the configuration right here to keep things self-contained in my notes... but if you want to do it properly, you can just follow the official Quick Start guide below:
- Official documentation: https://react.i18next.com/guides/quick-start
# i18next: An internationalization library. The engine. You can use it with plain JavaScript.
# react-i18next: A library to integrate the above into React.
yarn add i18next react-i18next
Let’s prepare the translation json files.
mkdir -p ./src/locales/en
mkdir -p ./src/locales/ja

echo '{}' > ./src/locales/en/translation.json
echo '{}' > ./src/locales/ja/translation.json
Then, prepare the file to load and configure the translation json files.
mkdir -p ./src/i18n

echo "
import EN_TRANSLATION from '@/locales/en/translation.json'
import JA_TRANSLATION from '@/locales/ja/translation.json'
import i18n from 'i18next'
import { initReactI18next } from 'react-i18next'

const resources = {
  ja: {
    translation: JA_TRANSLATION,
  },
  en: {
    translation: EN_TRANSLATION,
  },
}

i18n
  .use(initReactI18next)
  .init({
    resources,
    lng: 'en',
    interpolation: {
      escapeValue: false
    }
  })

export default i18n
" > ./src/i18n/index.ts
In the entry point of the React app (main.tsx), load the configuration file.
echo "
import App from '@/App'
import '@/i18n'
import '@/index.css'
import React from 'react'
import ReactDOM from 'react-dom/client'
import { BrowserRouter } from 'react-router-dom'

ReactDOM.createRoot(document.getElementById('root')!).render(
  <React.StrictMode>
    <BrowserRouter basename='/my-react'>
      <App />
    </BrowserRouter>
  </React.StrictMode>
)
" > ./src/main.tsx
Using the Translation Extension
Here’s how to use useTranslation and t. The translation json files are still empty, but when that’s the case, the key will be displayed as-is. No problem! I noticed that reference sites often use unique key strings for translations, but in the json files, you can actually use Japanese as keys. I think that’s totally fine, since it makes the components more readable!
echo "
import Button from '@/components/Button'
import formatDate from '@/utils/formatDate'
import { useEffect, useState } from 'react'
import { useTranslation } from 'react-i18next'
function HomePage() {
const { t } = useTranslation()
const [formattedDate, setFormattedDate] = useState<string>('')
useEffect(() => {
const currentDate = new Date()
const dateStr = formatDate(currentDate)
setFormattedDate(dateStr)
}, [])
const handleClick = () => {
alert(t('Button がクリックされた!'))
}
return (
<div>
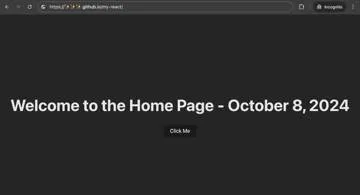
<h1>{t('Welcome to the Home Page')} - {formattedDate}</h1>
<Button label={t('Click Me')} onClick={handleClick} />
</div>
)
}
export default HomePage
" > ./src/pages/HomePage.tsx
Introducing a Tool to Automatically Fill Translation json Files
This tool scans the t function in your components and automatically fills in the translation json files for you. Using this tool, you can work like this:
- Write all the strings in the components using
t - Run the tool
- The json file will be filled with combinations like
text to translate: initial value - Then, just open the json file and translate all the “text to translate” entries one by one
Super easy, right?
yarn add --dev i18next-parser
Let’s add the configuration file below. There are more detailed settings in the official README, so it might be a good idea to copy those for future reference.
- Official README: https://github.com/i18next/i18next-parser?tab=readme-ov-file#options
echo "
export default {
  contextSeparator: '_',
  createOldCatalogs: true,
  defaultNamespace: 'translation',
  defaultValue: (locale, namespace, key) => {
    return \`\${key}\` // This is a change from the default setting.
  },
  indentation: 2,
  keepRemoved: false,
  keySeparator: '.',
  lexers: {
    hbs: ['HandlebarsLexer'],
    handlebars: ['HandlebarsLexer'],
    htm: ['HTMLLexer'],
    html: ['HTMLLexer'],
    mjs: ['JavascriptLexer'],
    js: ['JavascriptLexer'],
    ts: ['JavascriptLexer'],
    jsx: ['JsxLexer'],
    tsx: ['JsxLexer'],
    default: ['JavascriptLexer'],
  },
  lineEnding: 'auto',
  locales: ['ja', 'en'], // This is a change from the default setting.
  namespaceSeparator: ':',
  output: 'src/locales/\$LOCALE/\$NAMESPACE.json', // This is a change from the default setting.
  pluralSeparator: '_',
  input: undefined,
  sort: false,
  verbose: false,
  failOnWarnings: false,
  failOnUpdate: false,
  customValueTemplate: null,
  resetDefaultValueLocale: null,
  i18nextOptions: null,
  yamlOptions: null,
}
" > ./i18next-parser.config.js
Run this command:
yarn run i18next "./src/App.tsx" "./src/**/*.tsx"

# If you're worried that the config isn’t being loaded, try this↓
yarn run i18next "./src/App.tsx" "./src/**/*.tsx" --config "./i18next-parser.config.js"
And voilà, the translation json files will be filled up like magic. Ahh, efficiency!
{
  "Welcome to the Home Page": "Welcome to the Home Page",
  "Click Me": "Click Me",
  "Button がクリックされた!": "Button がクリックされた!"
}